How To Install Seren V3 On Kodi (Advanced Set Up Guide)
Tell your friends about this!
This detailed guide will provide you with step by step instructions to Install the Seren Kodi Addon and set it up for use on any device you prefer.
While other guides may only cover the basics, we dive into more than just installation with complete setup instructions for a flawless streaming experience.
Because Seren is a premium addon choice, it requires a little more configuration than other options that will allow it to function to its full capabilities.
It is one of the most popular, well-known Kodi Addons of all time for VOD Content. For these reasons and more, it is currently featured as the “Best Premium Kodi Addon” on our list of Popular Addon choices.
In order to use Seren, users must integrate a premium resolving service such as Real-Debrid, AllDebrid, or Premiumize. We must also set up Seren with the installation of an external provider that will pull in streaming links for viewing.
With these services integrated, Seren provides the highest quality streaming that play with no buffering whatsoever. Many of these are available in HD quality including 1080p & 4K.
Below you will find a screenshot guide to install Seren on your Kodi device. We are using an Amazon Fire TV Stick which is the most popular media device since we can jailbreak it.
Those who use Android Boxes or other Kodi devices can also follow along with the same instructions and this includes MECOOL, BuzzTV, onn. Google TV 4K Pro, NVIDIA SHIELD, Mac, PC, and mobile phones/tablets.
Screenshot Guide
In the guide below, we will install Seren on a Fire TV Stick 4K Max. However, these instructions will also work for any Kodi device you prefer including various Firestick devices, Android/Google TV Boxes, and more.
- Launch Kodi
- Click the settings icon

- Click System
- Hover over Add-ons menu item and turn on Unknown sources if not already on
- Read this important Warning prior to proceeding.
Add-ons will be given access to personal data stored on your device!
This is why it is so important running our #1 Ranked VPN if you’re going to use a 3rd party addon such as Seren.
A VPN won’t allow these 3rd party add-ons to gain access to your personal data.
- Click back on remote to go back to the System page
- Select File Manager
- Click Add source
- Click <None>
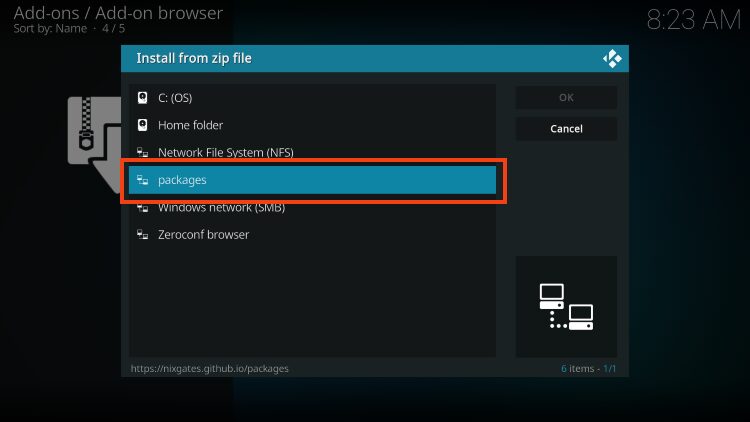
- Type the following URL – https://nixgates.github.io/packages and click OK
- GitHub is the official website that hosts this repository URL
- Highlight the box under the source that you just typed in and enter a name for this media source, type packages or any other name you would like to identify this source as and click OK again
- Click your back button on remote or keyboard until you are back on the System screen
- Choose Add-ons
- Click Install from zip file
- Choose packages or another name you assigned the media source in the previous step

- Click nixgates.repository.zip
- Wait for Nixgates Repo Add-on installed message to appear
- Click Install From Repository
- Choose Nixgates Repo
- Click Video Add-Ons
- Select Seren
- Click Install
- Kodi will then prompt the message below stating “The following additional add-ons will be installed”, Click OK
- You will then encounter Seren Kodi Addon installed message
Installation is now complete.
However, there is some set up required in order to use the addon. Continue reading to learn how to set up Seren to stream Movies and TV Shows.
How to Set Up Seren on Kodi with Provider Package
As noted above, we must authorize an external provider that will scrape sources for streaming links.
Continue reading for a step-by-step guide to integrate a Provider Package.
1. From the home screen of Seren, choose Tools.
2. Click Provider Tools.
3. Choose Manage Provider Packages.
4. Click Install Package.
5. Select Web Location.
6. Type the following URL exactly as it is listed here: http://bit.ly/a4kScrapers and click OK.
7. Click Install.
8. Click OK.
9. Click Close.
10. Go back to the page where you can enter the Open Settings Menu option again.
11. Hover over Playback and change to Source Select if you would like to choose the source to play (we recommend this) – then click OK button on right.
12. Hover over Scraping and change Preferred Cloud Location to whichever service you are using or prefer – then click OK button on right.
13. Go to Scraping / Minimum Sources and change to 20 to display more sources to choose from
The higher the number you set, the longer it will scrape for sources (I personally set this to 20)
How To Authorize Real-Debrid on Seren Kodi Addon
Once you have Seren installed and external provider packages enabled, we can authorize a premium resolving service.
We will also show you how to enable and authorize Real-Debrid which is the most popular unrestricted downloading service.
1. From the Seren main menu, select Tools.
2. Choose Open Settings Menu.
3. Click the toggle to Enable Real Debrid or if using Premiumize or AllDebrid, click the toggle to enable those services.
4. Click Authorize Real Debrid.
5. You are then provided with a Real-Debrid authorization code. Enter your code at the following link: https://real-debrid.com/device
6. After authorizing, Click OK.
That’s it! You can now enjoy this awesome add-on and all the features it provides.
Below are some optional extras for the Seren Kodi Addon.
How to Setup Trakt
Trakt users can also authorize this service within the Seren Kodi Addon.
Doing so will allow you to sync and scrobble your content across numerous platforms and devices.
1. Go back to the home screen of Seren Kodi and click Tools.
2. Select Trakt Sync Tools.
3. Choose Yes.
4. You are then provided with a Trakt authorization code. Go to https://trakt.tv/activate and type in the code that appears on your screen.
5. Click OK when Seren has successfully paired with Trakt
Seren setup is now complete. Enjoy!
Enable Smart Play
Seren has numerous advanced features and settings that make it a top-tier addon choice. One of these includes the Smart Play option that will automatically play the next episode of the season for any TV Show.
This is a fabulous way to enjoy a seamless viewing experience just as you would with popular Apps and APKs. In this guide, we are watching the 3rd season of The Andy Griffith Show which is one of the Best Public Domain TV Shows available.
1. From the home menu, select Tools.
2. Choose Open Settings Menu.
3. Scroll down to Playback and make sure Smart Play is enabled.
4. Adjust the minimum seconds left before showing data prompt to your preferred time.
5. Click OK.
6. You will then see the next episode prompt at the end of TV Show episodes.
Enjoy!
Seren Kodi Addon Description & Details
Once you have set up Seren within Kodi, it is easy to see the differences it has from other add-ons.
Some of the categories within Seren include Discover Movies, Discover TV Shows, My Files, Search, and Tools.
Auto-play is turned on as a default but this can be changed if you would like which we provide instructions for above.
After setting up this addon, users will find tons of categories and subcategories to choose from.
Content is loaded extremely fast and plays in high definition with no buffering for a fabulous viewing experience.
Seren is an awesome Kodi add-on that works great on any Kodi device you prefer including streaming devices such as the Amazon Firestick and more.
Give Seren a try today!
Is Seren Kodi Addon Safe to Use?
As with any unverified app or addon, it is important to scan these files with VirusTotal to check for spam or malware.
Shown below is the screenshot of this scan.
VirusTotal did not find any suspicious files or malware associated with the Repository URL.
But we still need to make sure we are protecting our data from these unverified providers.
Kodi even alerts us with a Warning message that notes these add-ons will be given access to personal data.
This is why it is important to protect ourselves with a VPN such as our #1 Ranked VPN Provider.
A VPN will provide you with an anonymous connection while streaming or downloading while using questionable add-ons such as this.
Is Seren Kodi Addon Legal?
TROYPOINT can’t determine whether these unverified addons/apps hold the proper licensing. As always, the end-user is ultimately responsible for all content accessed via 3rd party addons such as this.
Best VPN

30-day money back guarantee


