How to Stop Kodi Buffering On Any Device (5 Best Fixes)
This article will provide different methods to stop Kodi Buffering on any device.
If you have used Kodi for any length of time, you have probably noticed that streams oftentimes buffer.
Kodi is arguably one of the best streaming apps available today for many reasons. This is mainly due to the popular 3rd party add-ons and builds that are installed and used by thousands.
However, using these add-ons can usually lead to buffering or lagging when viewing content. The good news is that Kodi buffering is fixable.
This guide will explain the most common causes of buffering and share proven solutions to help on any device, from Firesticks to Android boxes, PCs, and more.
What Causes Kodi Buffering?
Buffering happens when the content you’re streaming doesn’t load as quickly as it plays. This can occur for several reasons:
- Slow Internet Connection: Your internet speed might not be fast enough for streaming.
- Cache Overload: Kodi stores temporary data (cache) while streaming. When the cache fills up, it can cause performance issues.
- Outdated Add-ons or Links: Some add-ons pull content from slow or outdated servers.
- Kodi Settings: Default settings may not be optimized for streaming.
- ISP Throttling: Your Internet Service Provider may throttle (slow down) your connection, especially when streaming.
Prior to using the methods outlined below, we first suggest resetting/restarting your software and device.
Oftentimes a simple Kodi reset is a great way to force close apps and other programs running that can slow down the speed.
This will eliminate add-ons that are not in use and remove clunky apps and more that can slow down your software and device. Installing a fresh Kodi is sometimes the best way to reduce buffering.
How To Stop Kodi Buffering
Listed below are five different methods that will stop Kodi buffering and make your streaming experience flawless.
1. Check Your Internet Connection
Internet speed is the most common reason for Kodi buffering. If your connection isn’t fast enough, videos will take longer to load.
Steps to Fix It:
- Run an internet speed test using tools like Speedtest.net.
- For smooth streaming, aim for 10 Mbps for standard-definition (SD) content and 25 Mbps for high-definition (HD) content.
- Restart your router to refresh the connection.
- Use an Ethernet cable instead of Wi-Fi for more stable internet.
The image below will give you an idea of the Mbps needed for streaming HD video files.
2. Use a Premium Debrid Service
One of the bests way to alleviate buffering on Kodi is by using a premium resolving service such as Real-Debrid, AllDebrid, or Premiumize.
These are file-hosting services that provide streaming links in high-definition to ensure you have a flawless streaming experience with Kodi or any other app you prefer.
These are paid services that cost between $5-15/month but are worth the investment if you stream frequently with Kodi.
Below is a quick guide on how to register and integrate a debrid service. We used Real-Debrid in this example.
1. Visit real-debrid.com and choose Sign Up
2. Enter your personal information and click Sign Up again
Note: We suggest using an Anonymous Email Account if you don’t want to enter a personal email address.
3. You will then encounter a message saying “your registration was successful.”
That’s it! Registration is now complete. Be sure to check your e-mail account for the activation e-mail from Real-Debrid.
4. After creating a real-debrid account, we can integrate this service within Kodi add-ons or builds. Now launch your preferred add-on. We used The Crew in this case.
5. Scroll down and select Tools.
6. Then select ResolveURL: Settings.
7. Within the Universal Resolvers menu on the left, scroll down and select (Re)Authorize My Account under Real-Debrid.
8. This screen will appear. Write down the code provided.
9. Open an Internet browser on another device and go to https://real-debrid.com/device.
10. Enter in the provided code from Step 6 and click Continue.
11. Your Real-Debrid application is now approved! Once finished, you can return to your device’s home screen and turn on your VPN.
3. Advanced Settings File
Oftentimes, the issue of buffering within Kodi can be traced back to a poor link within add-ons that can be adjusted in the settings.
To ensure you are using an up-to-date add-on with plenty of sources and scrapers, we suggest installing a quality add-on like The Crew or others listed on our website.
Below are the step-by-step instructions for configuring the Advanced Settings XML file.
- Launch Kodi
- Click the Settings icon

- Choose File Manager
- Click Add source
- Click <None>
- Type the following URL exactly how it is listed here – https://team-crew.github.io and click OK
- Highlight the box under the source that you just typed in and enter a name for this media source, type crew or change to any other name you would like to identify this source as and click OK
- Click your back button on remote or keyboard to return to System Page. Click Add-Ons.
- Choose install from zip file
- Choose crew or other name that identifies the media source.
- Click repository.thecrew.zip
- Wait for The Crew Repo add-on installed message to appear
- Click Install from repository
- Choose The Crew Repo
- Click Program Add-Ons
- Select The Crew Wizard
- Click Install
- Wait for The Crew Wizard Add-on Installed message to appear
- Choose Dismiss
- When prompted, click Continue
- Click Ignore
- Select The Crew Wizard again
- Click Open
- Select Maintenance
- Click System Tweaks/Fixes
- Choose Advanced Settings
- Click Quick Configure AdvancedSettings.xml
- Move the Video Cache Size to the Maximum MB allowed
- Click Write File
4. Clear Kodi Cache
Clearing the Cache within Kodi is a great way to eliminate buffering using similar steps to those shown in Method #1.
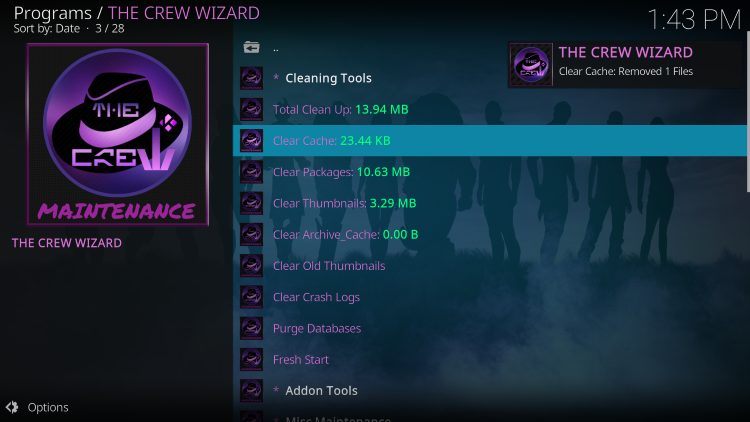
Within the Crew Wizard is a Cleaning Tool that works wonders to help delete and remove unwanted files/folders/etc.
If you do not have the Crew Wizard installed on your Kodi device, use the instructions outlined above in Method 1 to do so.
1. From the Kodi home screen and under add-Ons, choose The Crew Wizard
2. Click Maintenance
3. Click Cleaning Tools
4. Choose Clear Cache
5. Click Clear Cache again
6. You will then see Clear Cache completed message

5. Connect to a VPN
Some Internet Service Providers have been known to throttle service which can slow down your connection.
If the options listed above do not stop Kodi Buffering on your device, try connecting to a VPN.
A VPN will alter your IP Address and remove any download restrictions that may be imposed by your ISP.
This can also change your geo-location which will put you anywhere in the world. This will eliminate any regional restrictions you may have in your area for unlimited streaming.
Other Tips to Stop Kodi Buffering
If for some reason the solutions above aren’t working, there are a few other things you can do to improve speed:
- Upgrade your modem to a higher-powered device
- Put your Kodi device as close to your wi-fi router as possible
- Remove any items between your device and router that may be blocking the signal
- Turn off/Disable other devices that are connected to your wi-fi network
- Try other streaming applications
Final Thoughts
Kodi buffering can ruin an otherwise enjoyable streaming experience. Thankfully, the solutions outlined above are simple and effective for any device.
Start with the basics, like clearing your cache and checking your internet speed. If buffering persists, optimize Kodi settings, use a VPN, and integrate a debrid service for premium links.
Are there any tips we missed to help stop Kodi buffering? Let us know in the comments below!
Best VPN

30-day money back guarantee


